How To Set Up A Self-Hosted Ghost Installation: A Guide
or self-G-hosting 👻

I like to have control over my own server, so when I set up this site on Ghost I made sure to pick the DIY option. I still went the easiest route to that, but it turns out that setting up Ghost yourself can be a bit of a pain, especially if you're looking to just get through it without much tinkering, and I just did it for another couple of sites today, so here is my guide on how to set up your own self-hosted Ghost instance, minus all the frantic Googling:
Phase 1: The Site
0. I'm presuming you've already got a domain; if you don't, go and get one, it's easier to have it before doing the rest of this.
1. Sign up for Digital Ocean. That's a referral link, it'll get you $100 in free credit for 60 days, and if you stick around for long enough to spend $25, I get $25 free credit. No real money involved, it'll just subsidise my hosting bills here a little, and they seem to be the easiest, quickest and cheapest option for self-G-hosting.
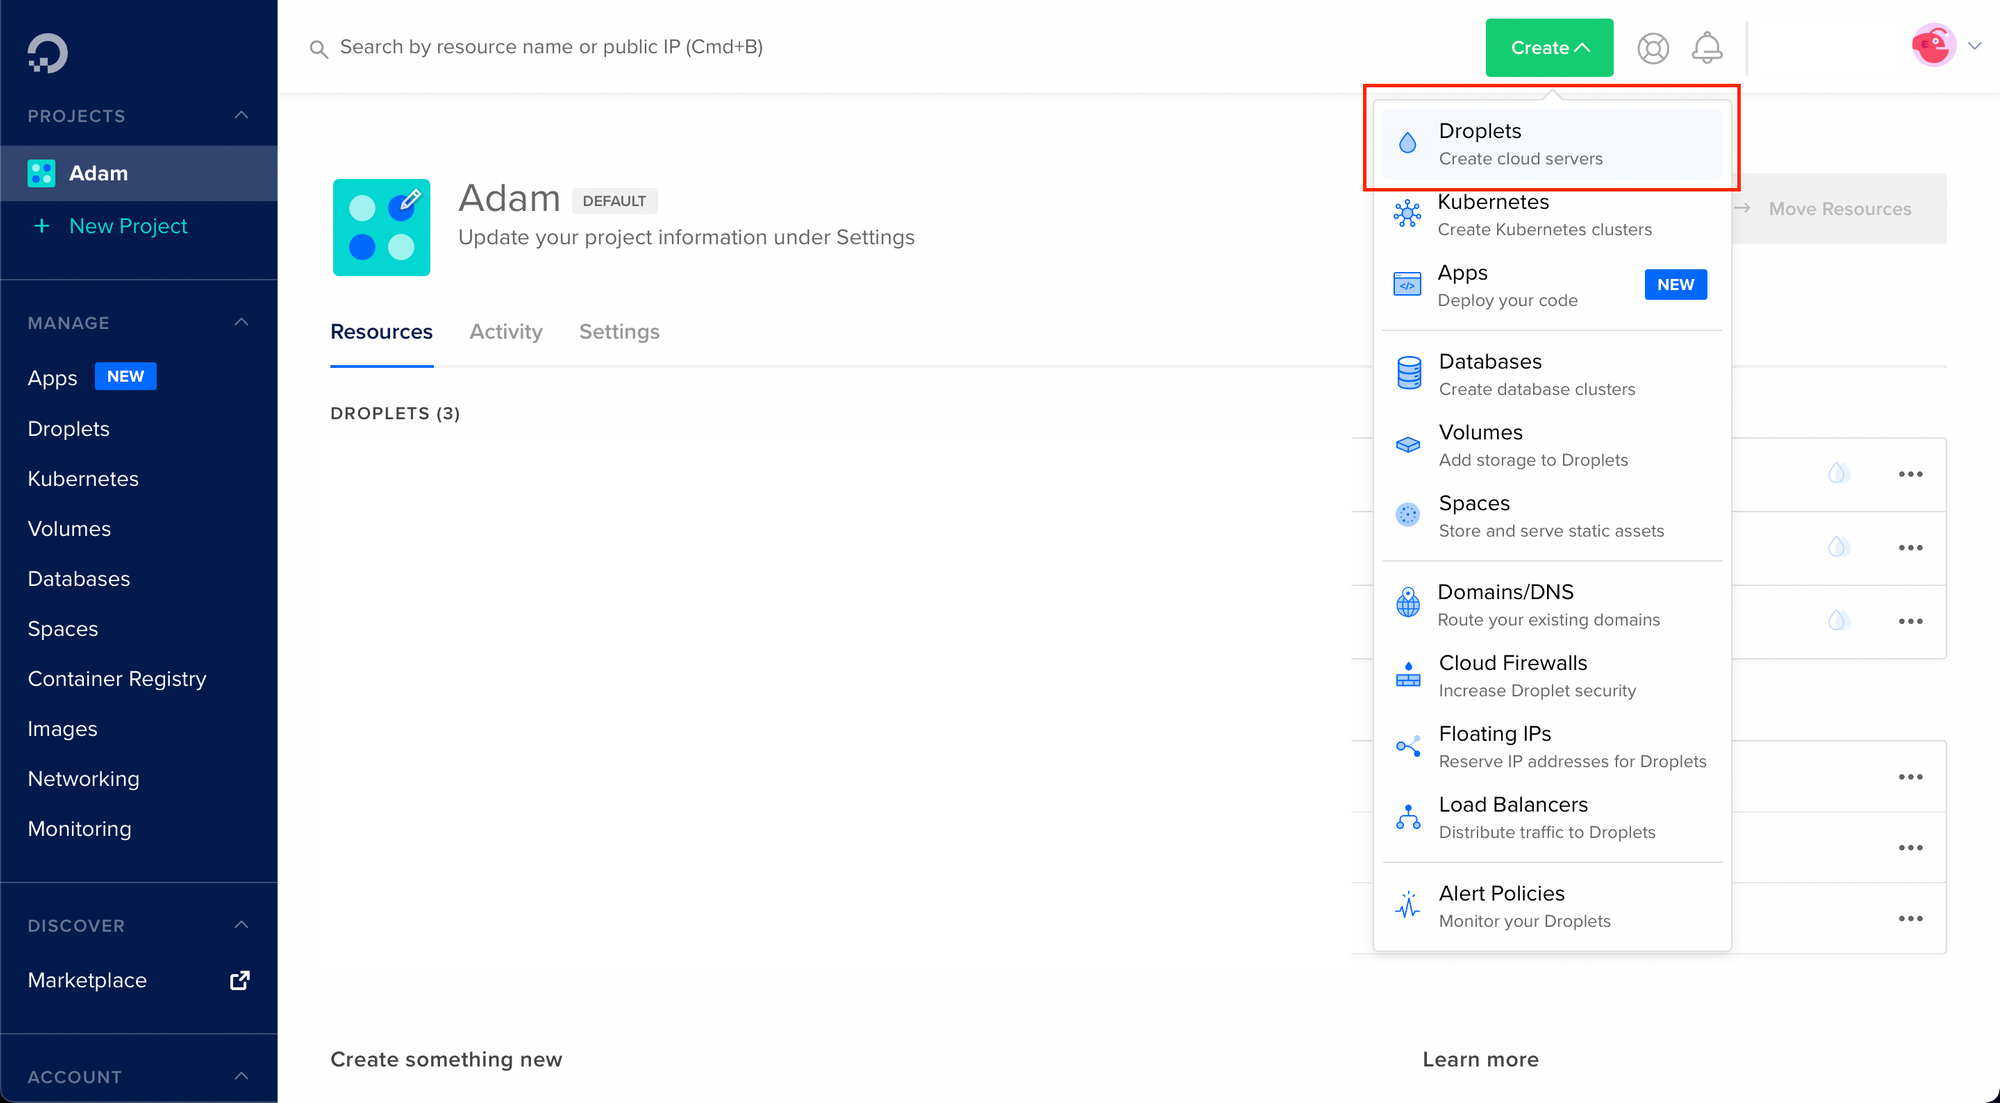
2. The first thing to do here is to set up what they call a droplet; that's their name for a cloud server:
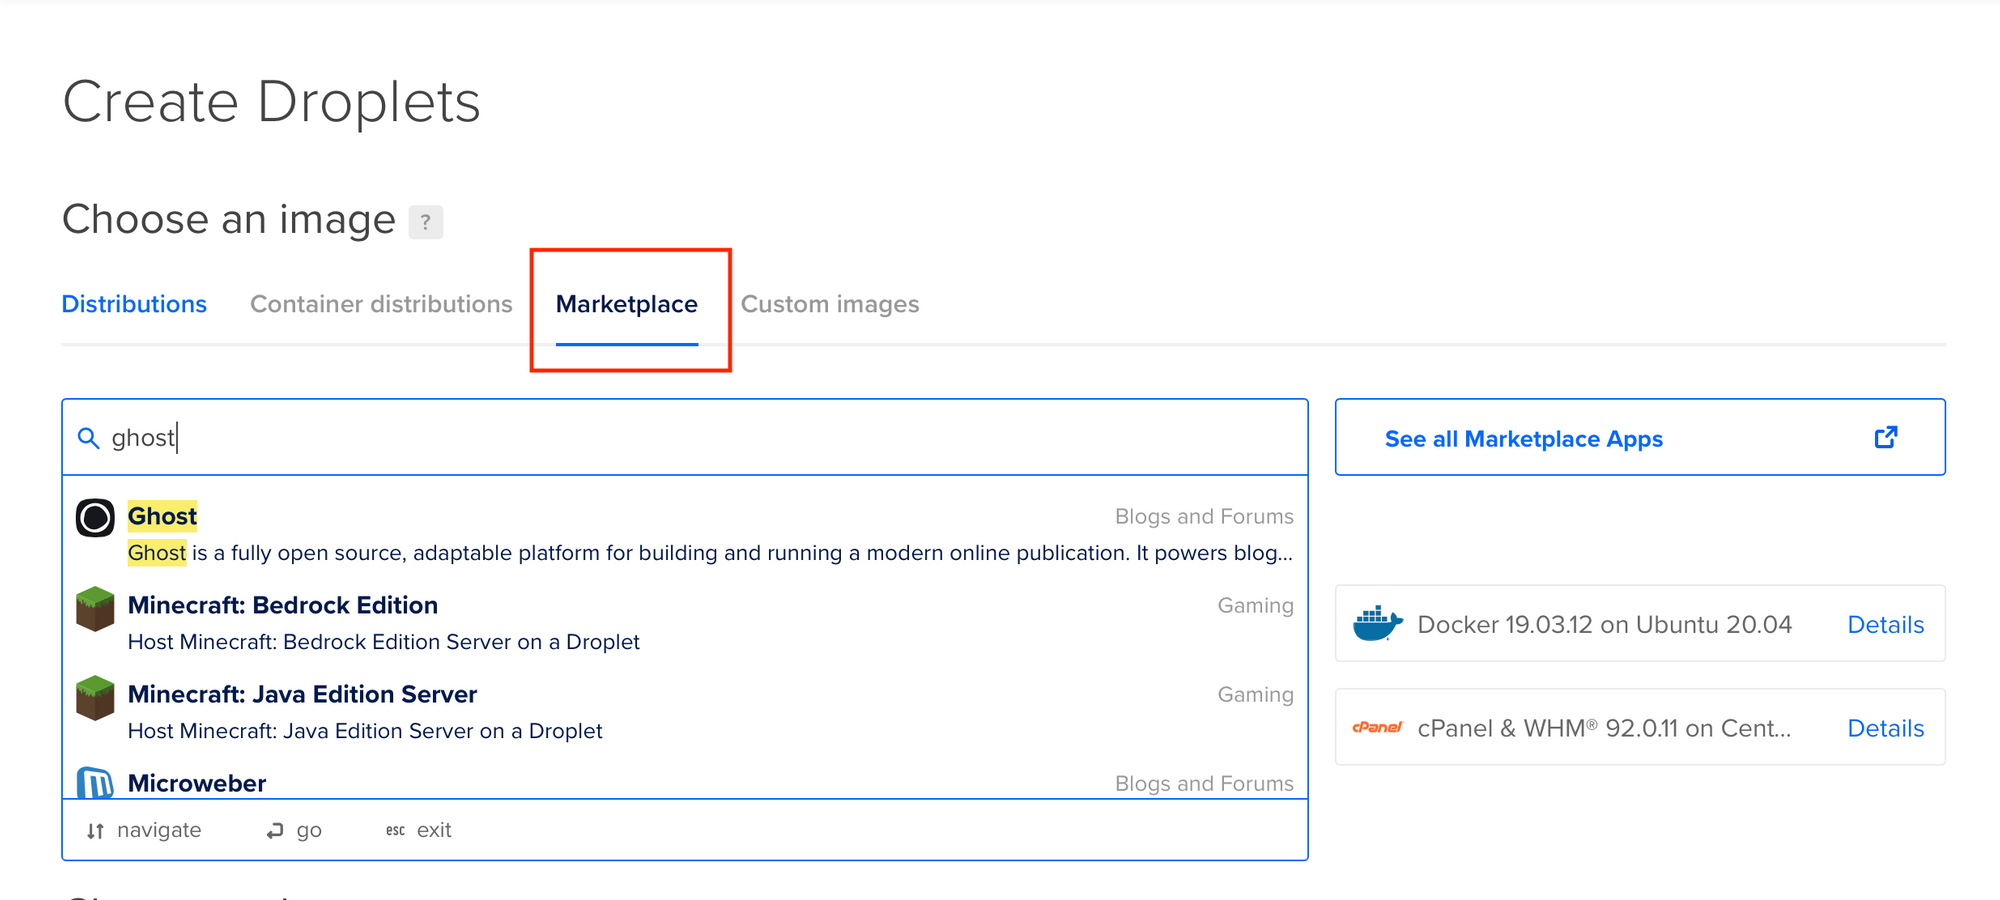
3. When you hit that page you'll be shown a load of options but you want to open that Marketplace tab and search for and select Ghost:
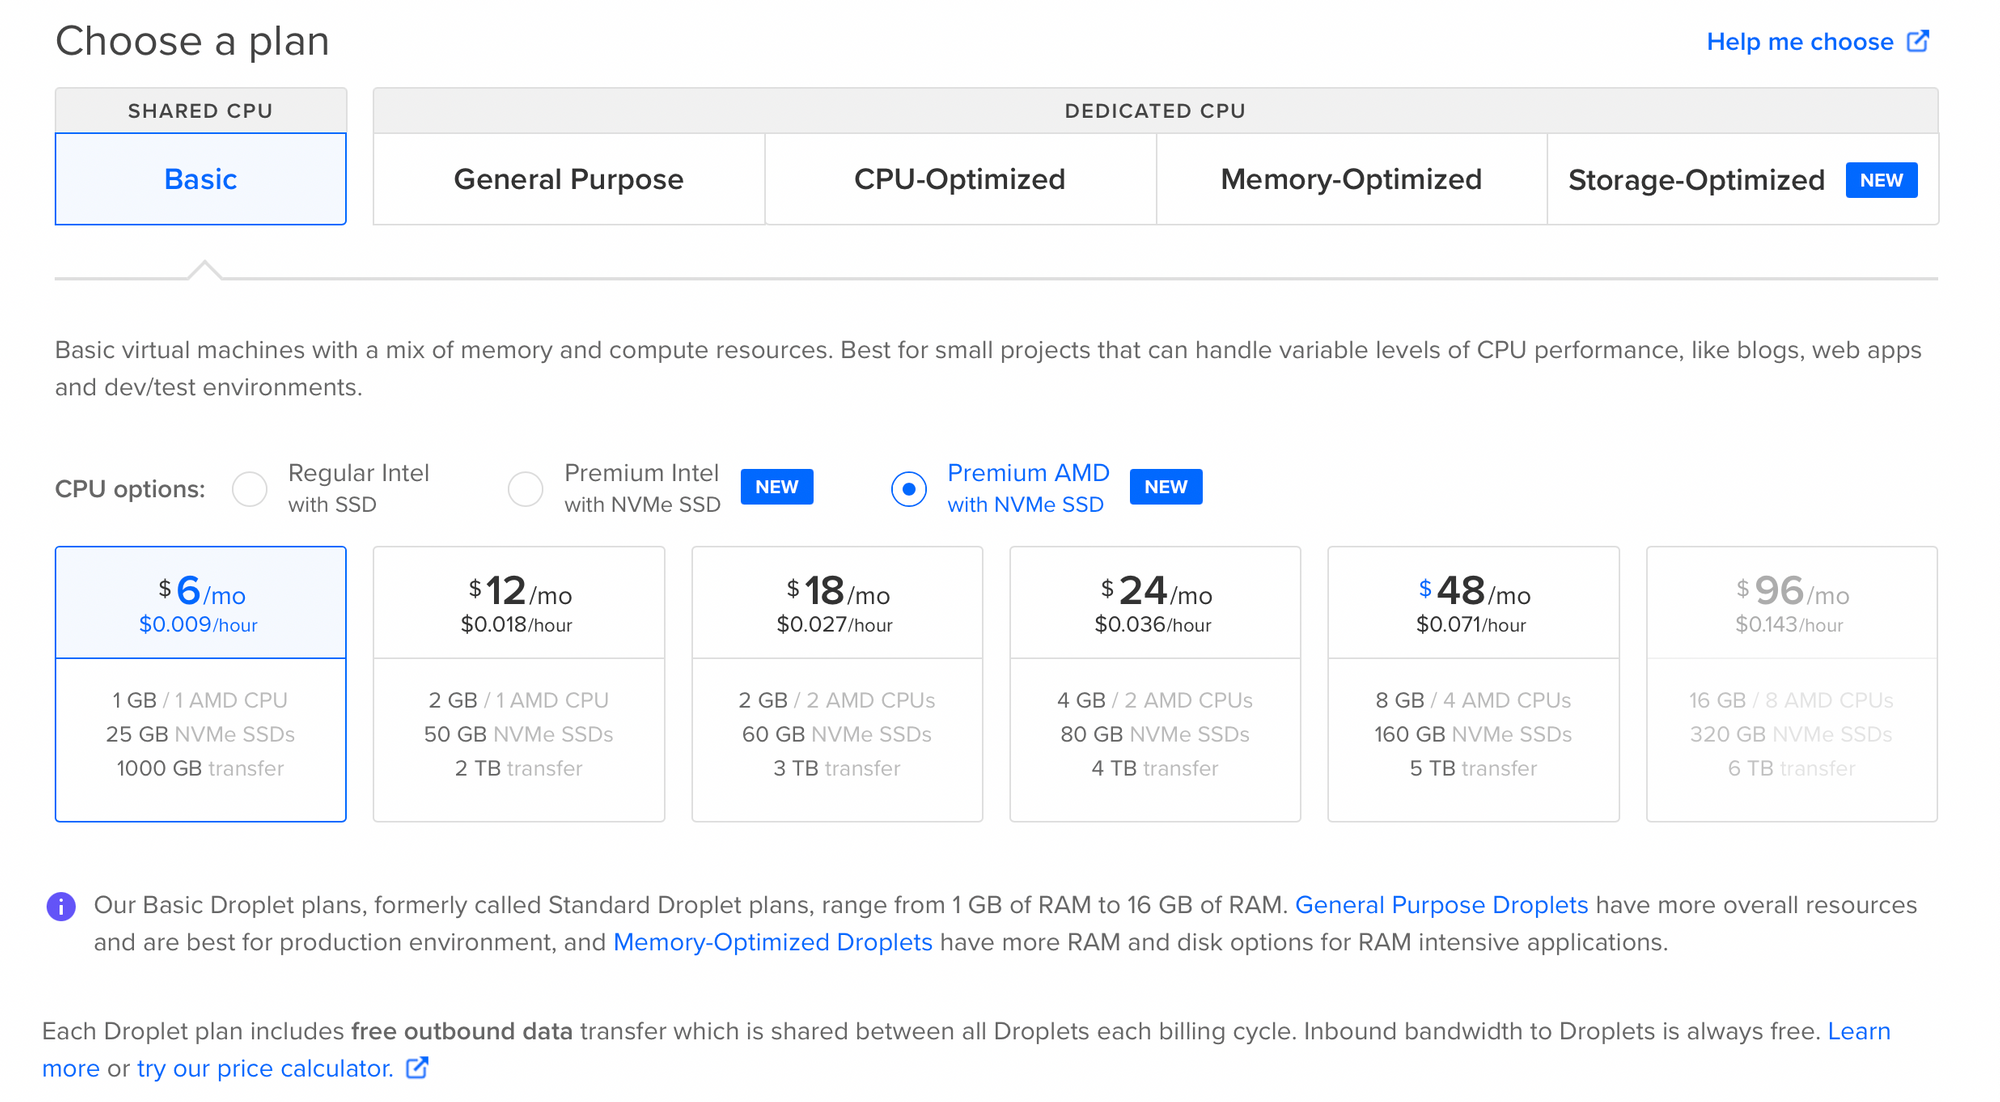
4. You'll then get taken through some more options around what plan to choose: you can probably go with one of the $5/$6 plans for now, if you find yourself needing more you can easily size up in the interface down the road:
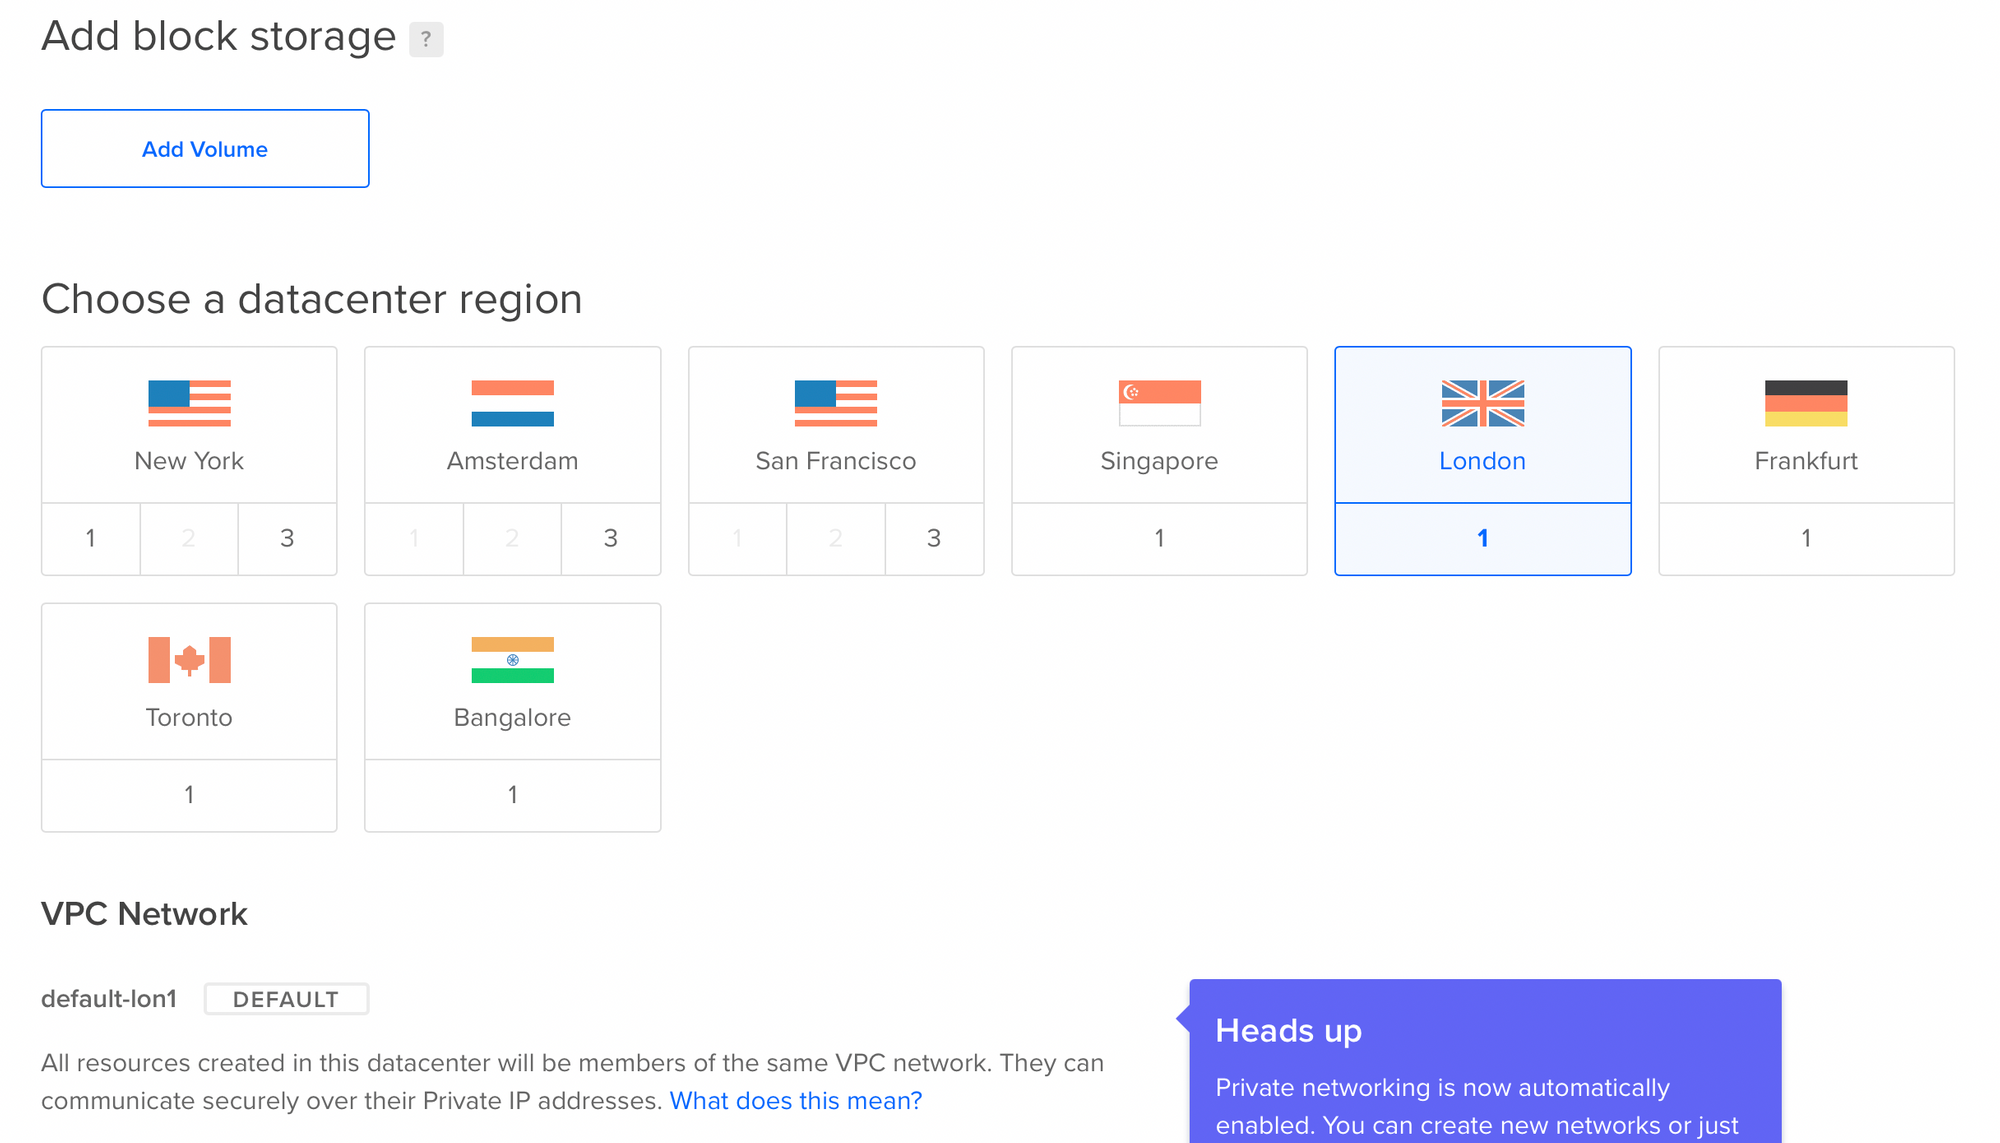
5. Ignore the block storage option and then choose your region, I have London because I'm British cor blimey god save the queen:
6. Again, additional options can be left for now. Then you get the Authentication bit. You should choose the SSH option, and for that you might need to set up your SSH key if you haven't already, which Digital Ocean handily provides a guide for here. Make sure to note down the passphrase in your password manager; we'll be using it in Phase 2.
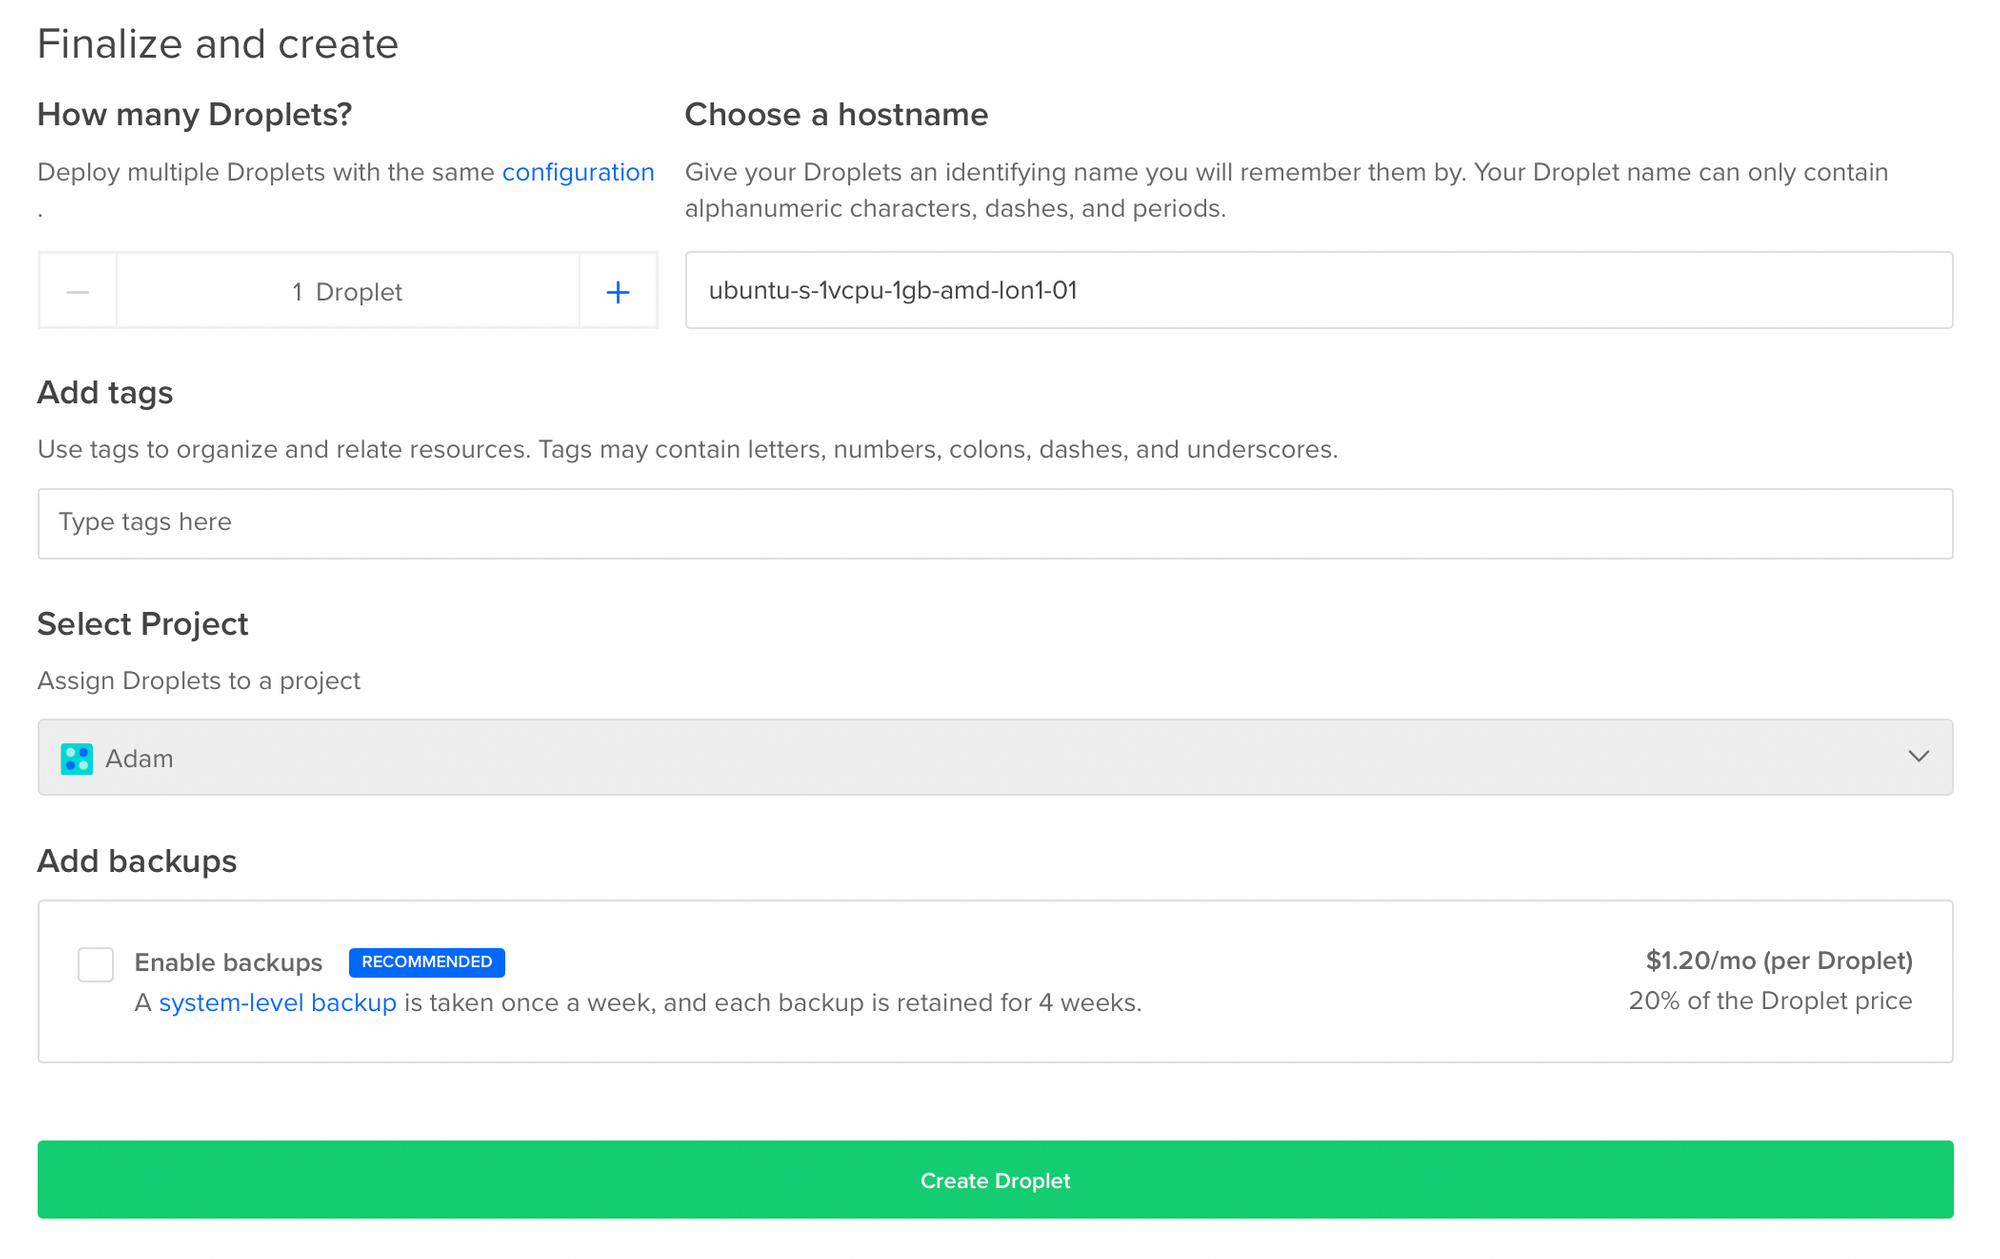
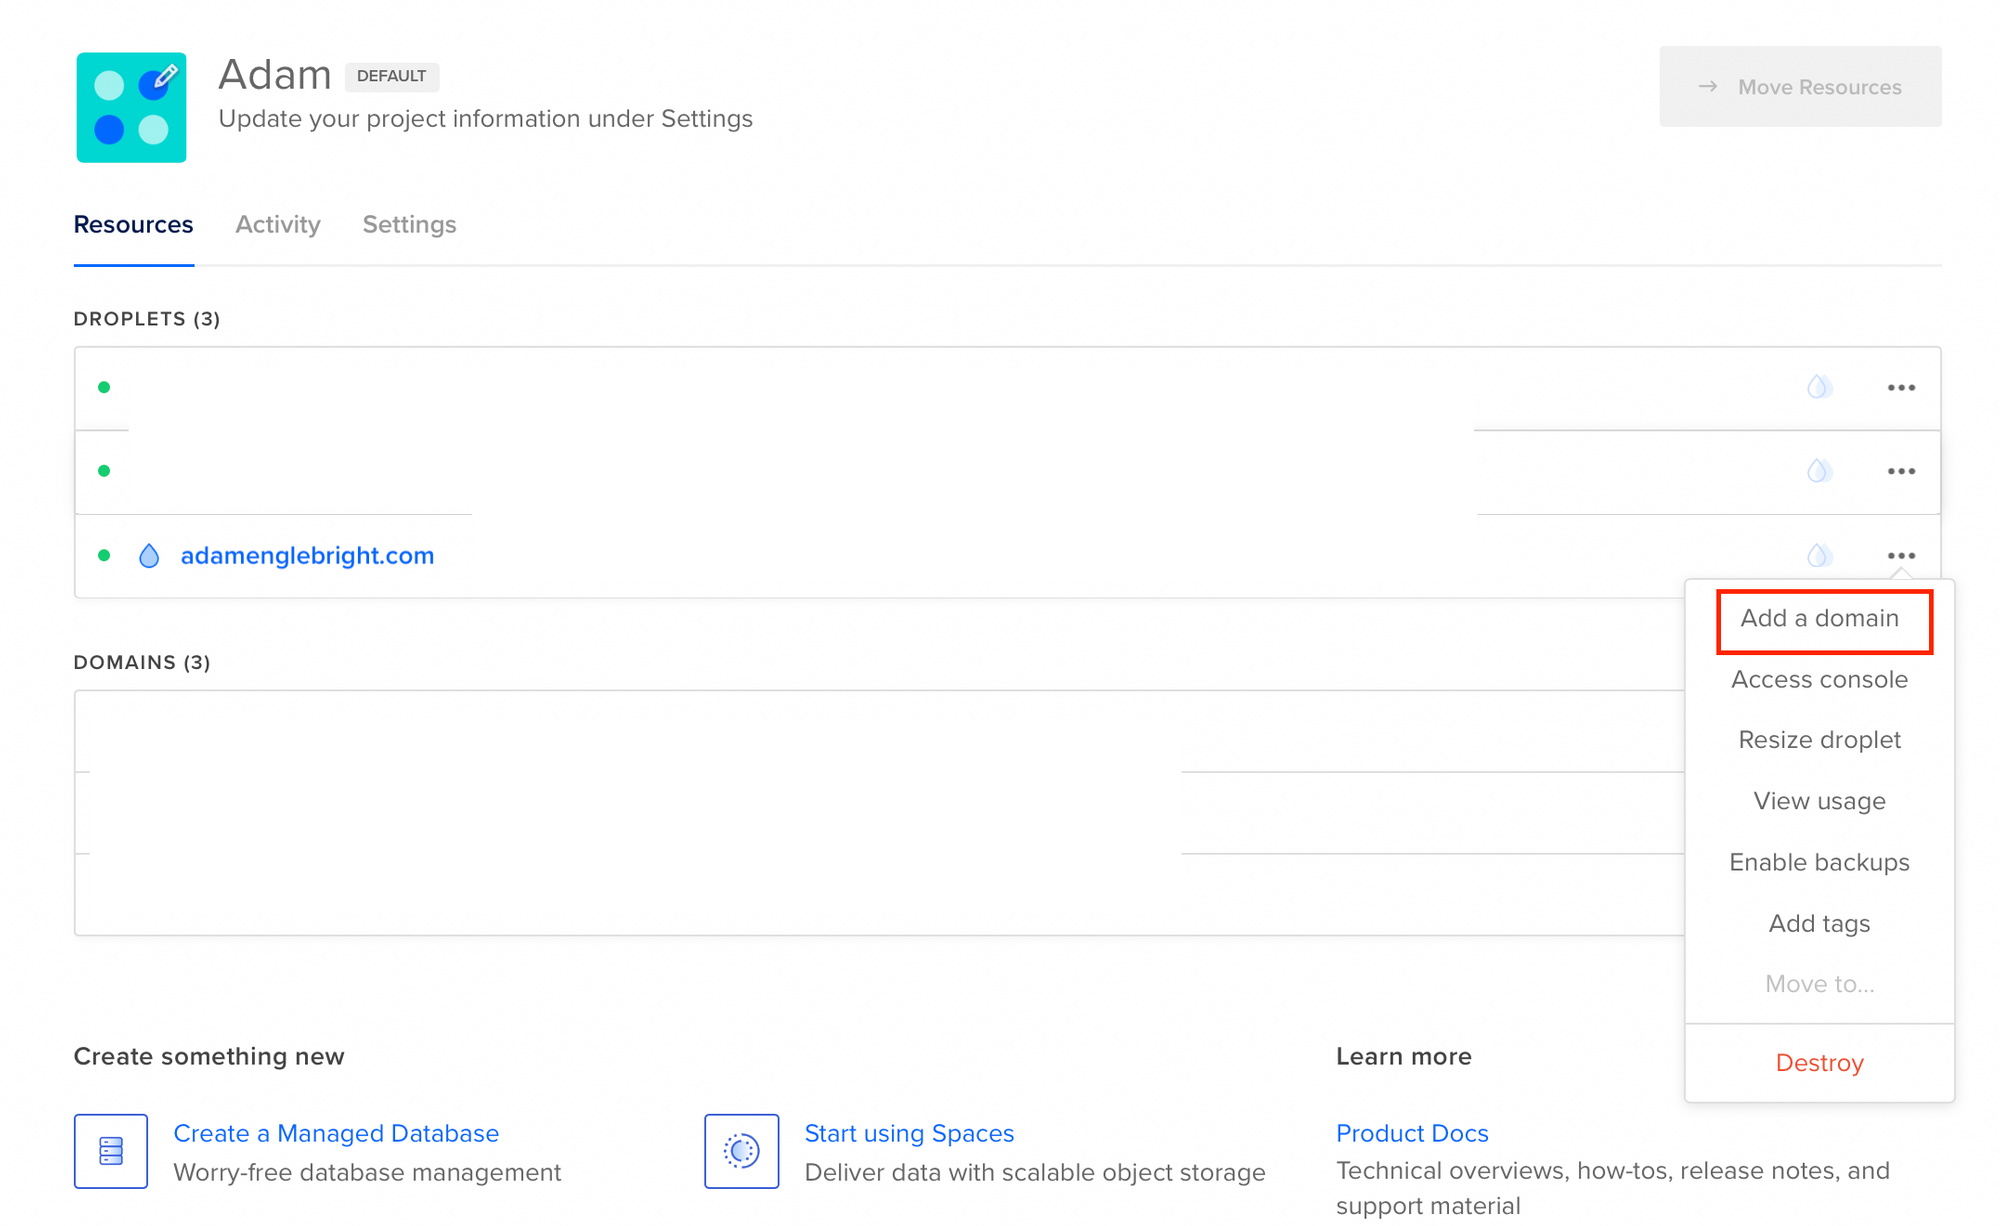
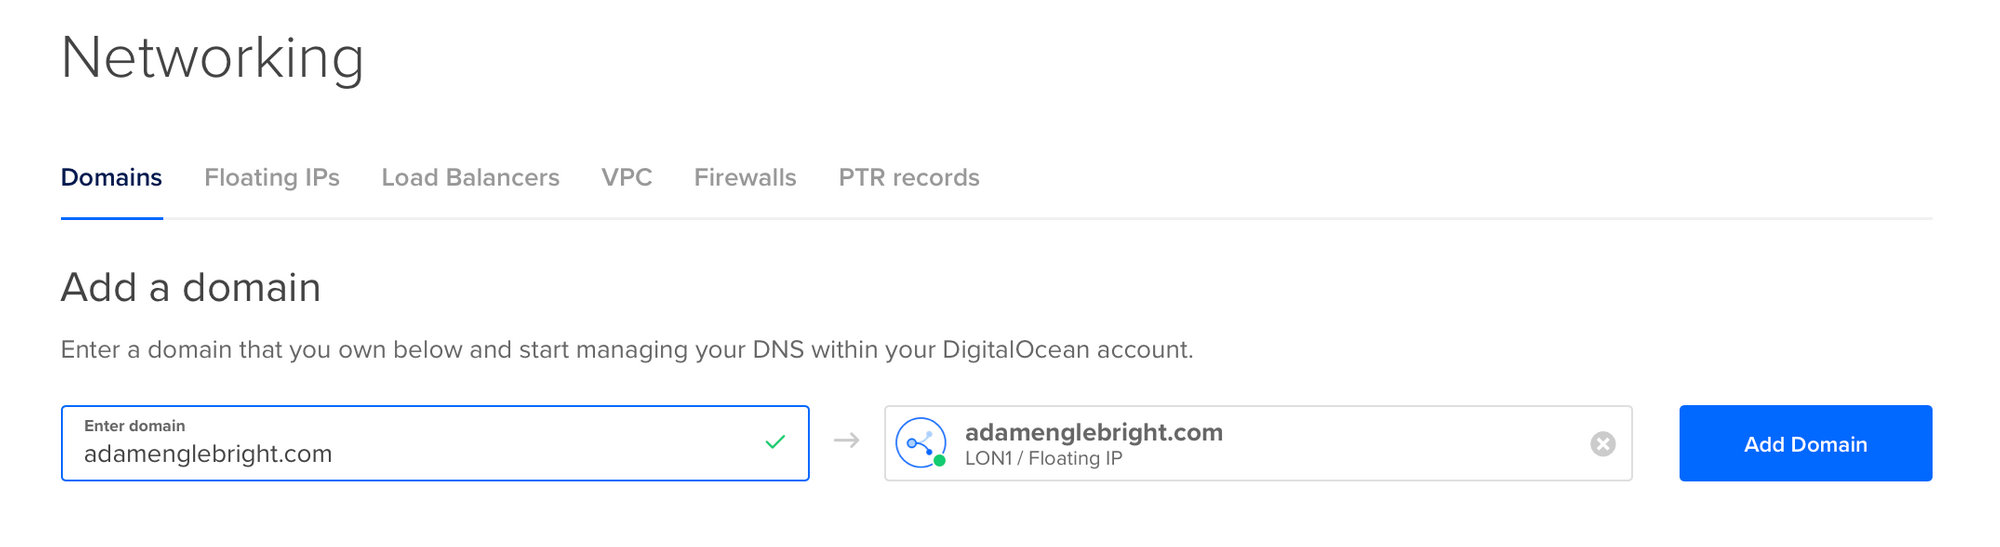
7. Once you've done that, ignored the remaining options and hit the big green , it might think about things for a while, but pretty soon you'll be in business and have yourself a droplet! From the project page you'll want to set up your domain; just pop it in the box and 'add' it to your droplet.
8. Once you've done that, you'll want to click on your domain. It'll show you a list of nameservers, the imaginatively-named ns1-3:
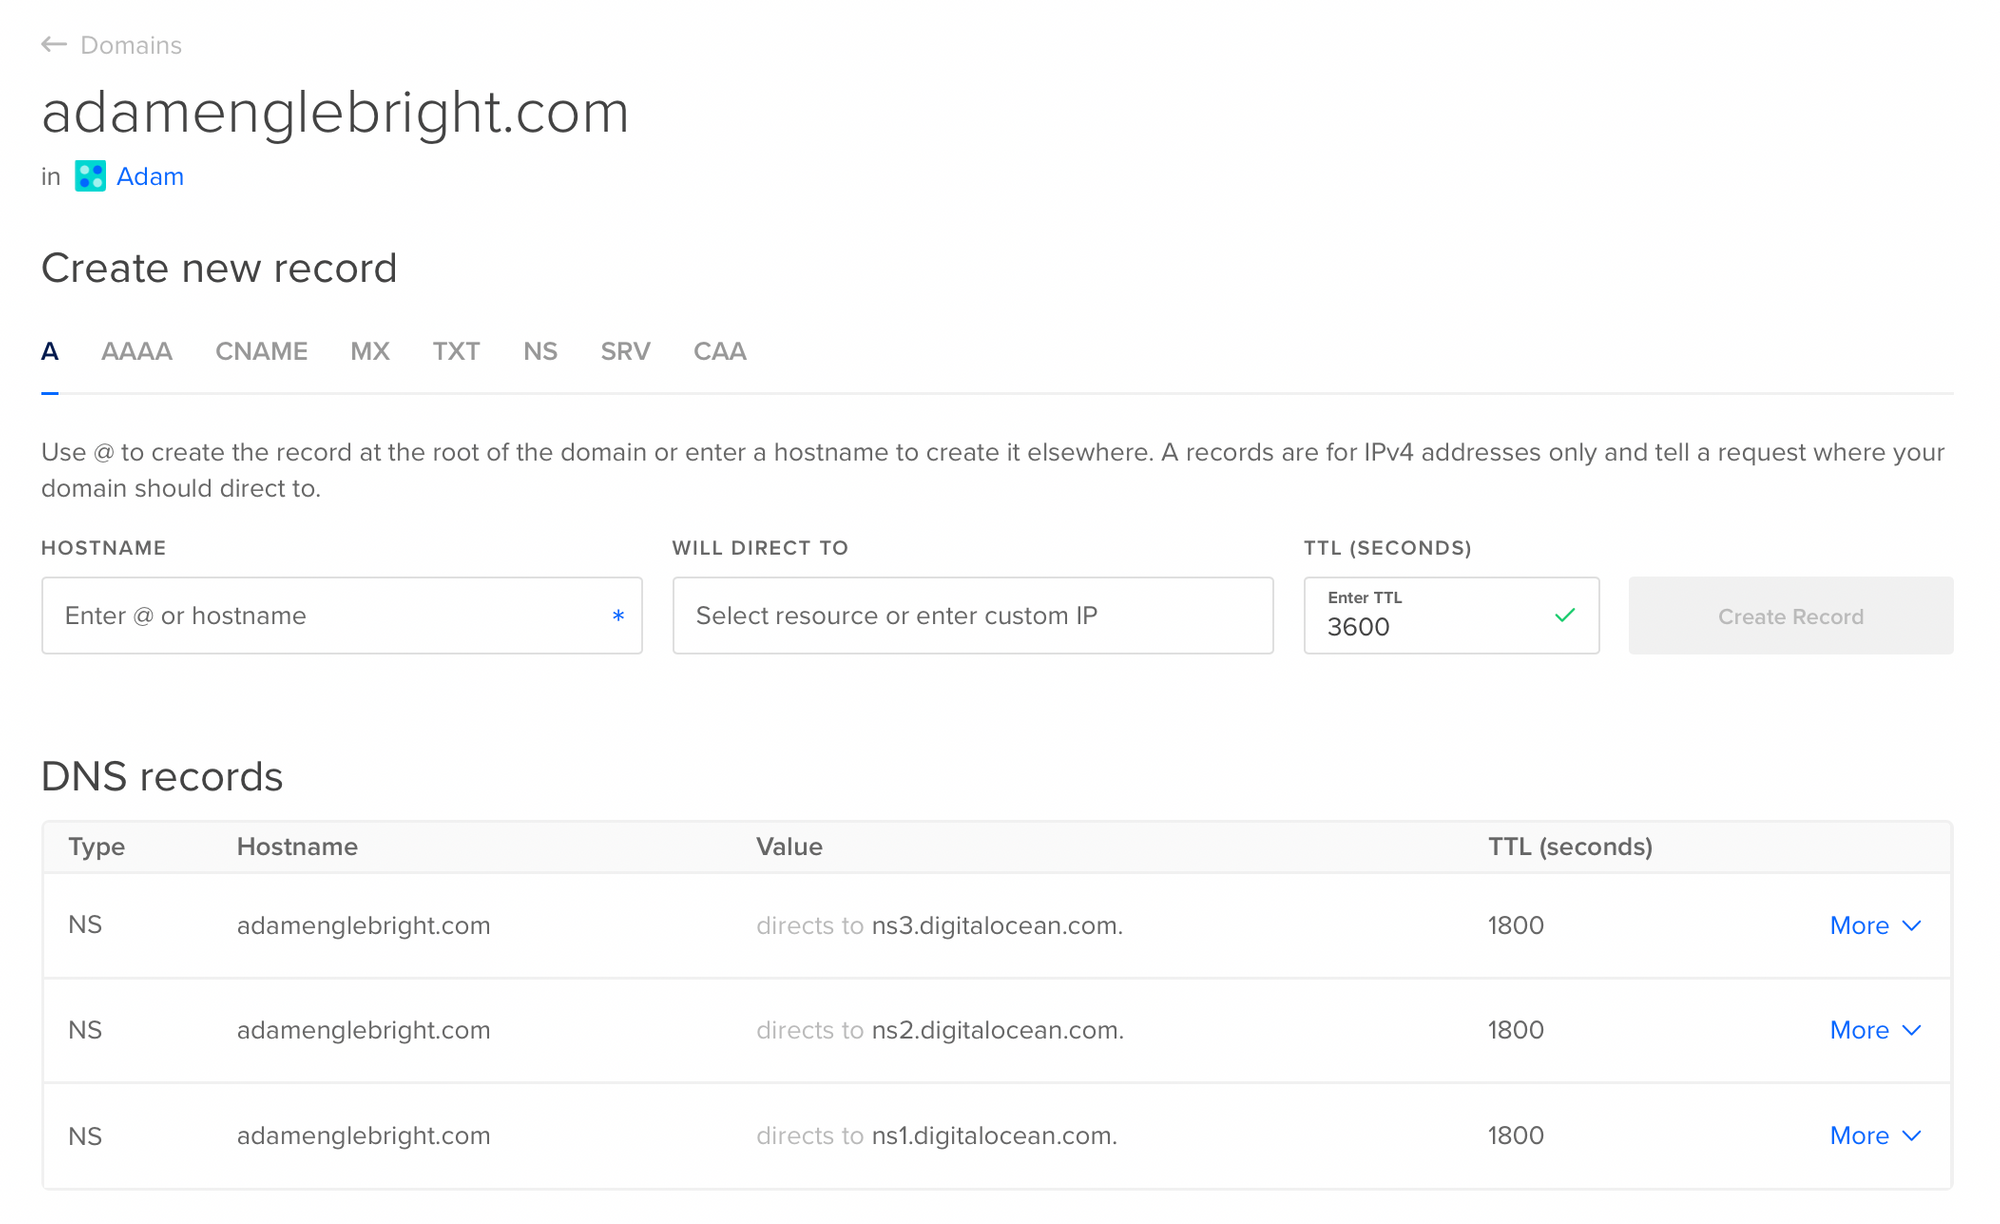
You'll need to go to your domain registrar and change the nameservers on your domain to these ones. It should be pretty straightforward, Digital Ocean have a guide here which covers common registrars.
9. OK! Once you've got those nameservers set up properly, Phase 1 is complete! You can head over to yourdomain.com/ghost and (provided the DNS has propogated) you'll be able to set up your account on your Ghost instance. Go to yourdomain.com/ghost, and then follow the setup instructions there.
Phase 2: The Email
One of the things that's nice about Ghost is that it's not just a blogging platform, it can send your email newsletter as well! However, when you're trying to do it yourself, this is where you can come unexpectedly unstuck (this happened to me!) The two important things to understand are that:
a) there are two types of emails Ghost sends, and;
b) the Digital Ocean setup does some things for you automatically (but if you're not paying attention you might not notice and then end up more confused than before, as you didn't realise you coul skip a lot of steps in Ghost's own tutorial).
There are two types of emails Ghost sends.
These are transactional emails, and bulk emails. Transactional emails are, e.g. signup confirmation or password resets; simple emails sent to one person for one thing. Bulk emails are when you send an email out to all your subscribers. Ghost have a little thing explaining the difference here. Bulk emails, despite being the ones that theoretically require the more heavy-duty implementation, are actually the easier of the two to set up, Ghost-side. Transactional emails theoretically should work without additional configuration, but I have found in practice that this is not the case—I believe due to Digital Ocean throttling or preventing SMTP connections to prevent people using their instances to spam people. Therefore, we're going to set up a service called Mailgun and have them both running through that.
Digital Ocean does a lot of the stuff for you!
Like setting up a user account on the server for you to do all the stuff with. The first time I tried to set this up I didn't realise that, went down a rabbithole of trying to set up my own account; it was a whole thing. No need for that hassle!
1. For Phase 2, we'll also start by setting up an account; this time for Mailgun. This should all be pretty straightforward (they boast about how quick it is!)
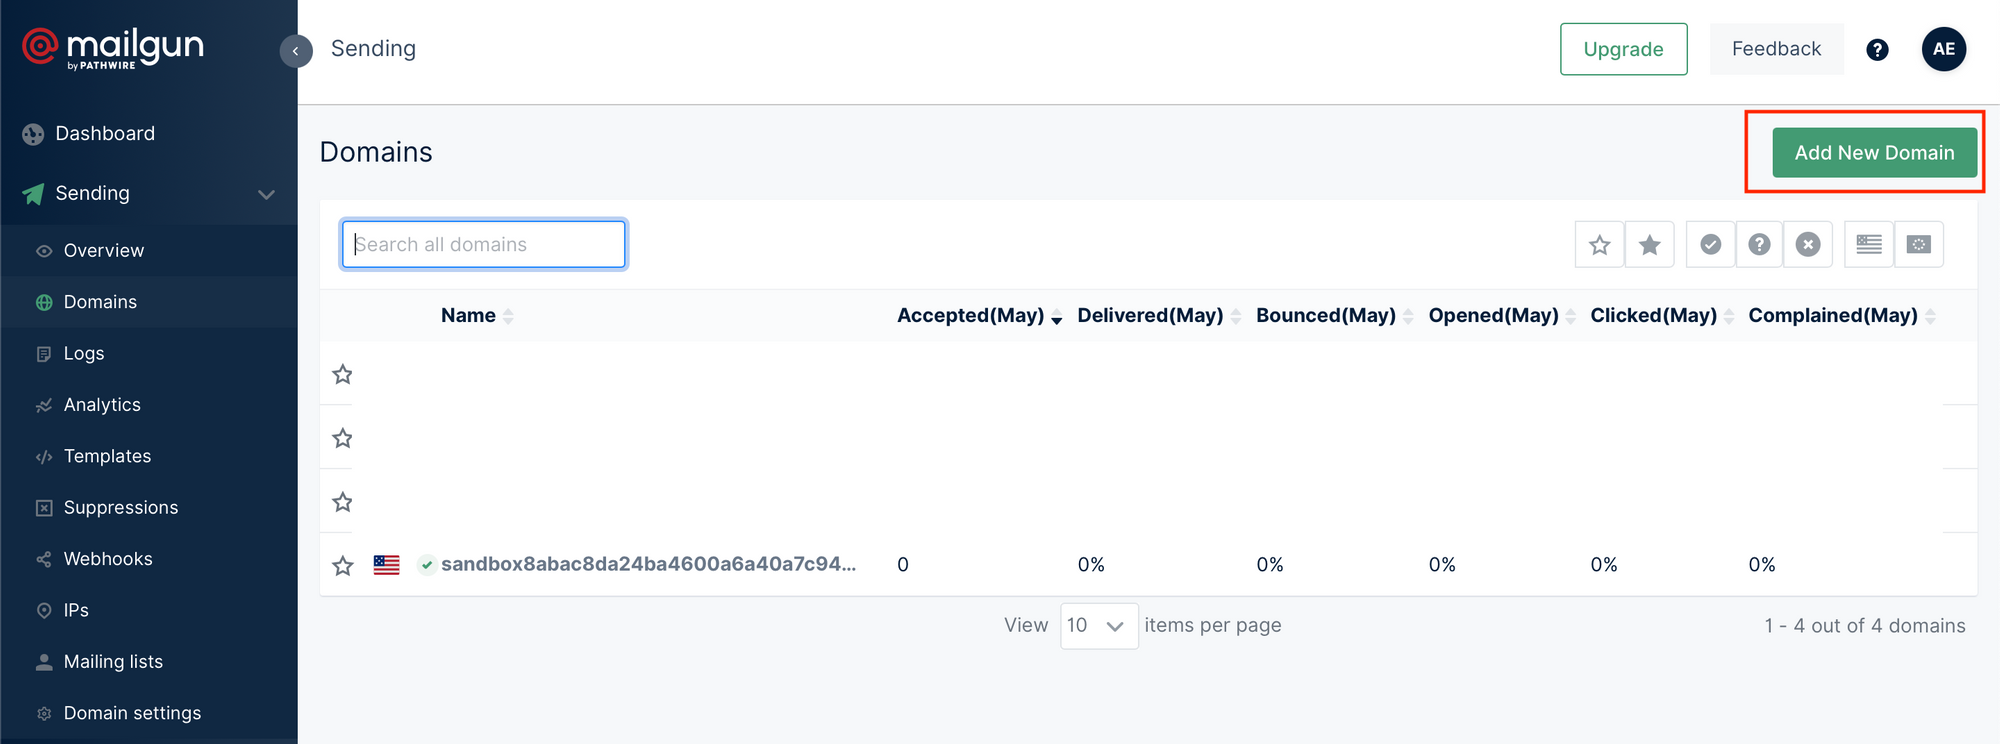
2. Once you've set that up, you'll want to go to Domains, under Sending in the left-hand menu, and click the "Add New Domain" option on the top-right.
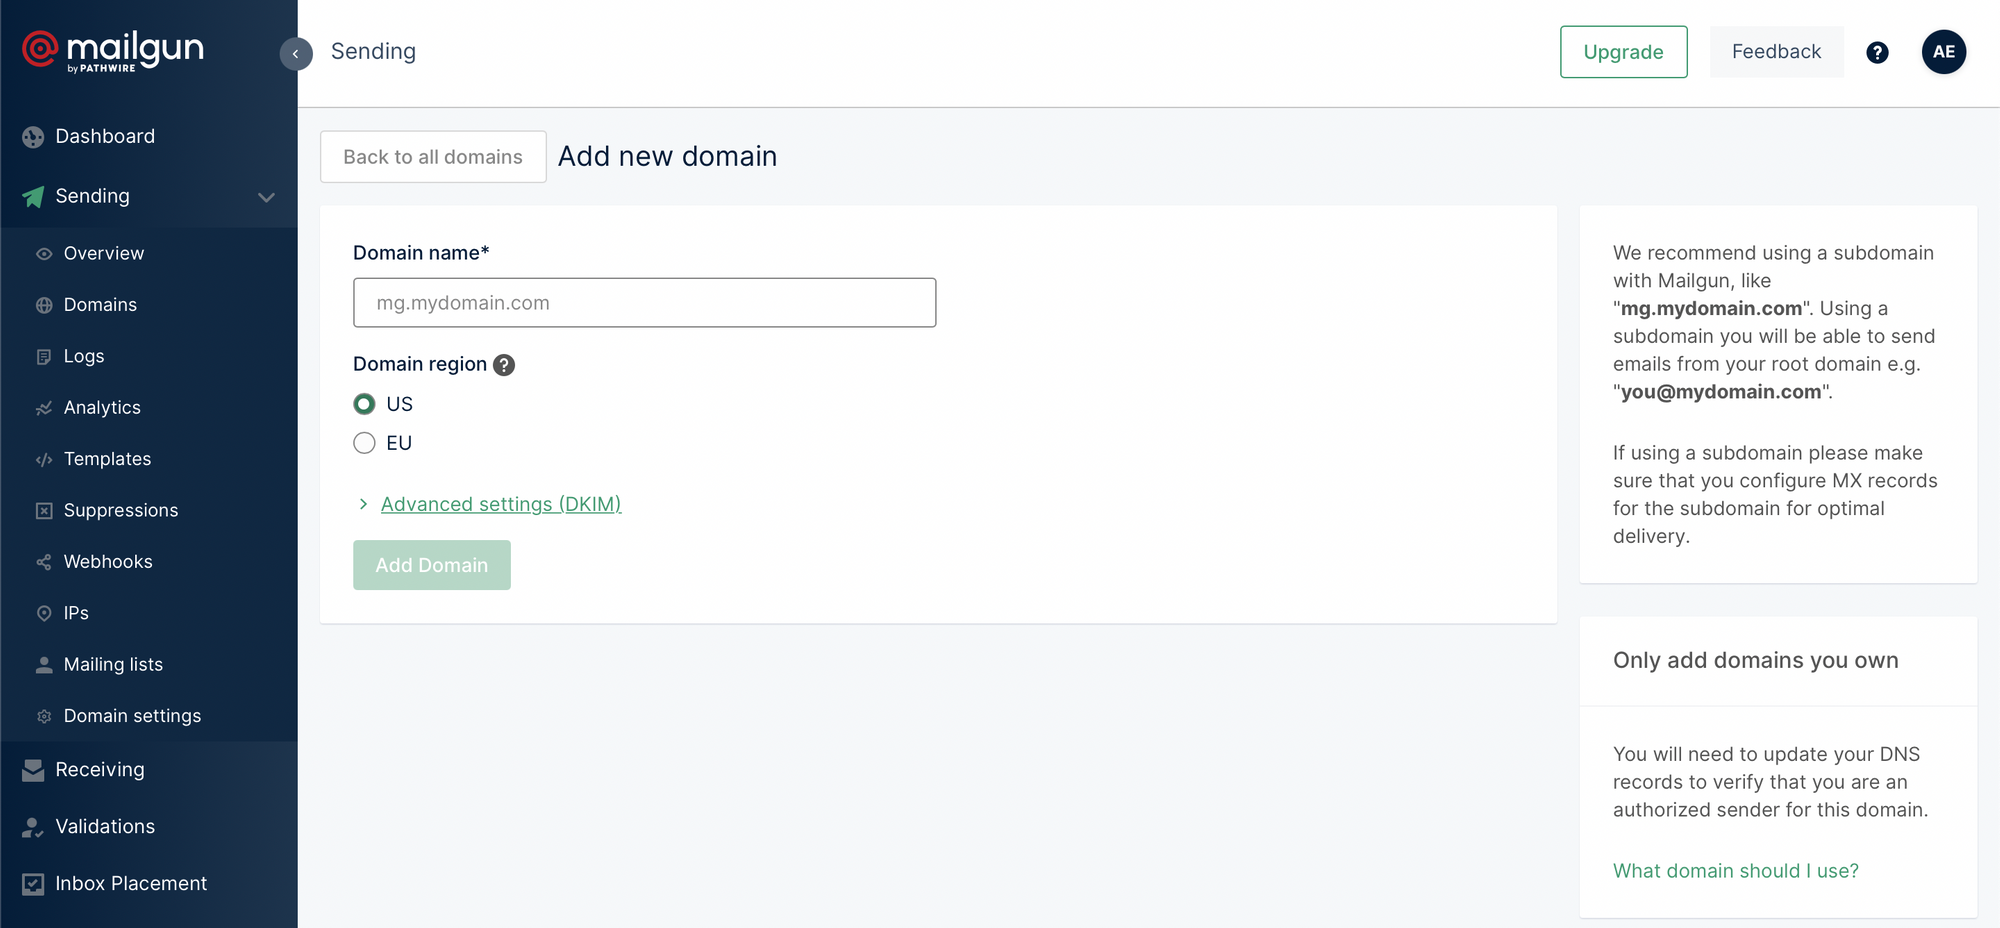
3. You'll then be asked to choose your domain and region. They suggest you set up mailgun using a subdomain of the main domain, usually mg.yourdomain.com, which you should definitely do!
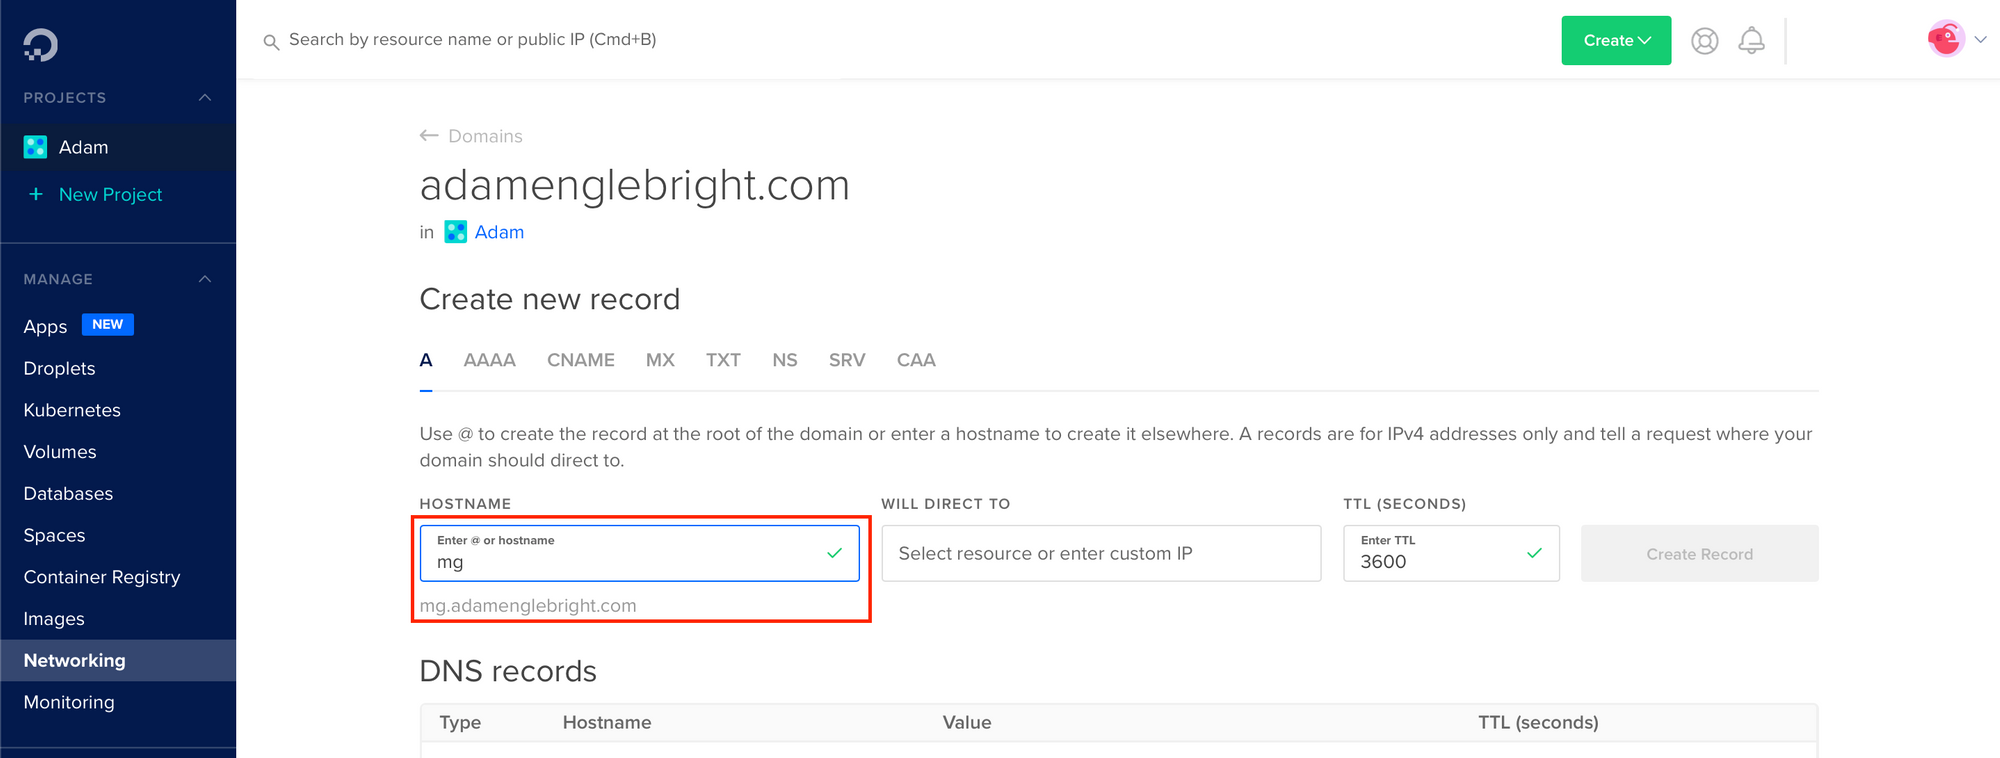
4. Then you'll be passed on to a page where you'll get a load of DNS records to enter into Digital Ocean.

5. We've already seen the Digital Ocean domains page (under 'Manage > Networking' in the left-hand nav bar) and here you just want to enter in the DNS entries from Mailgun into that—though a word of caution; you'll want to be careful because it automatically appends the top level of your domain to whatever you enter into the 'hostname' box, so unless you're careful you'll get mg.yourdomain.com.yourdomain.com!
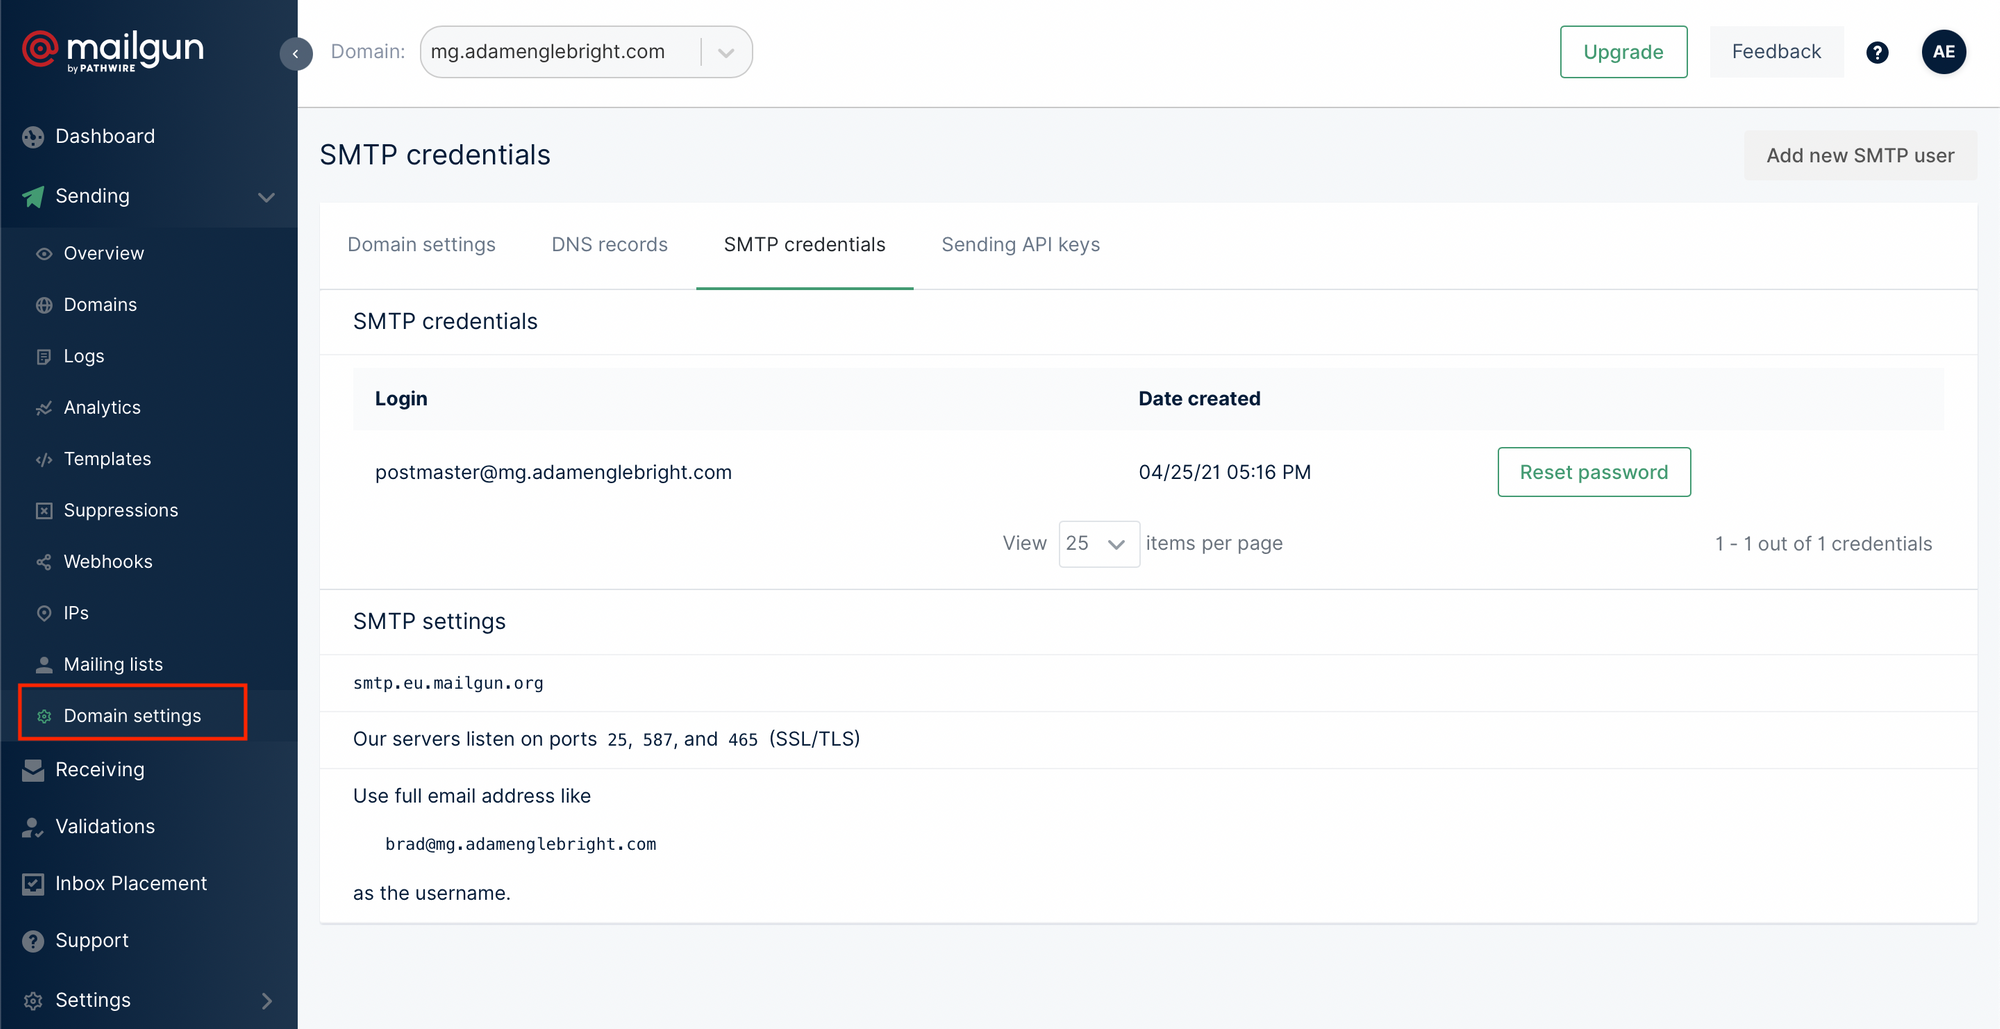
6. You'll want to get the Mailgun API key and SMTP password from Mailgun, in Sending > Domain Settings on the left-hand side:
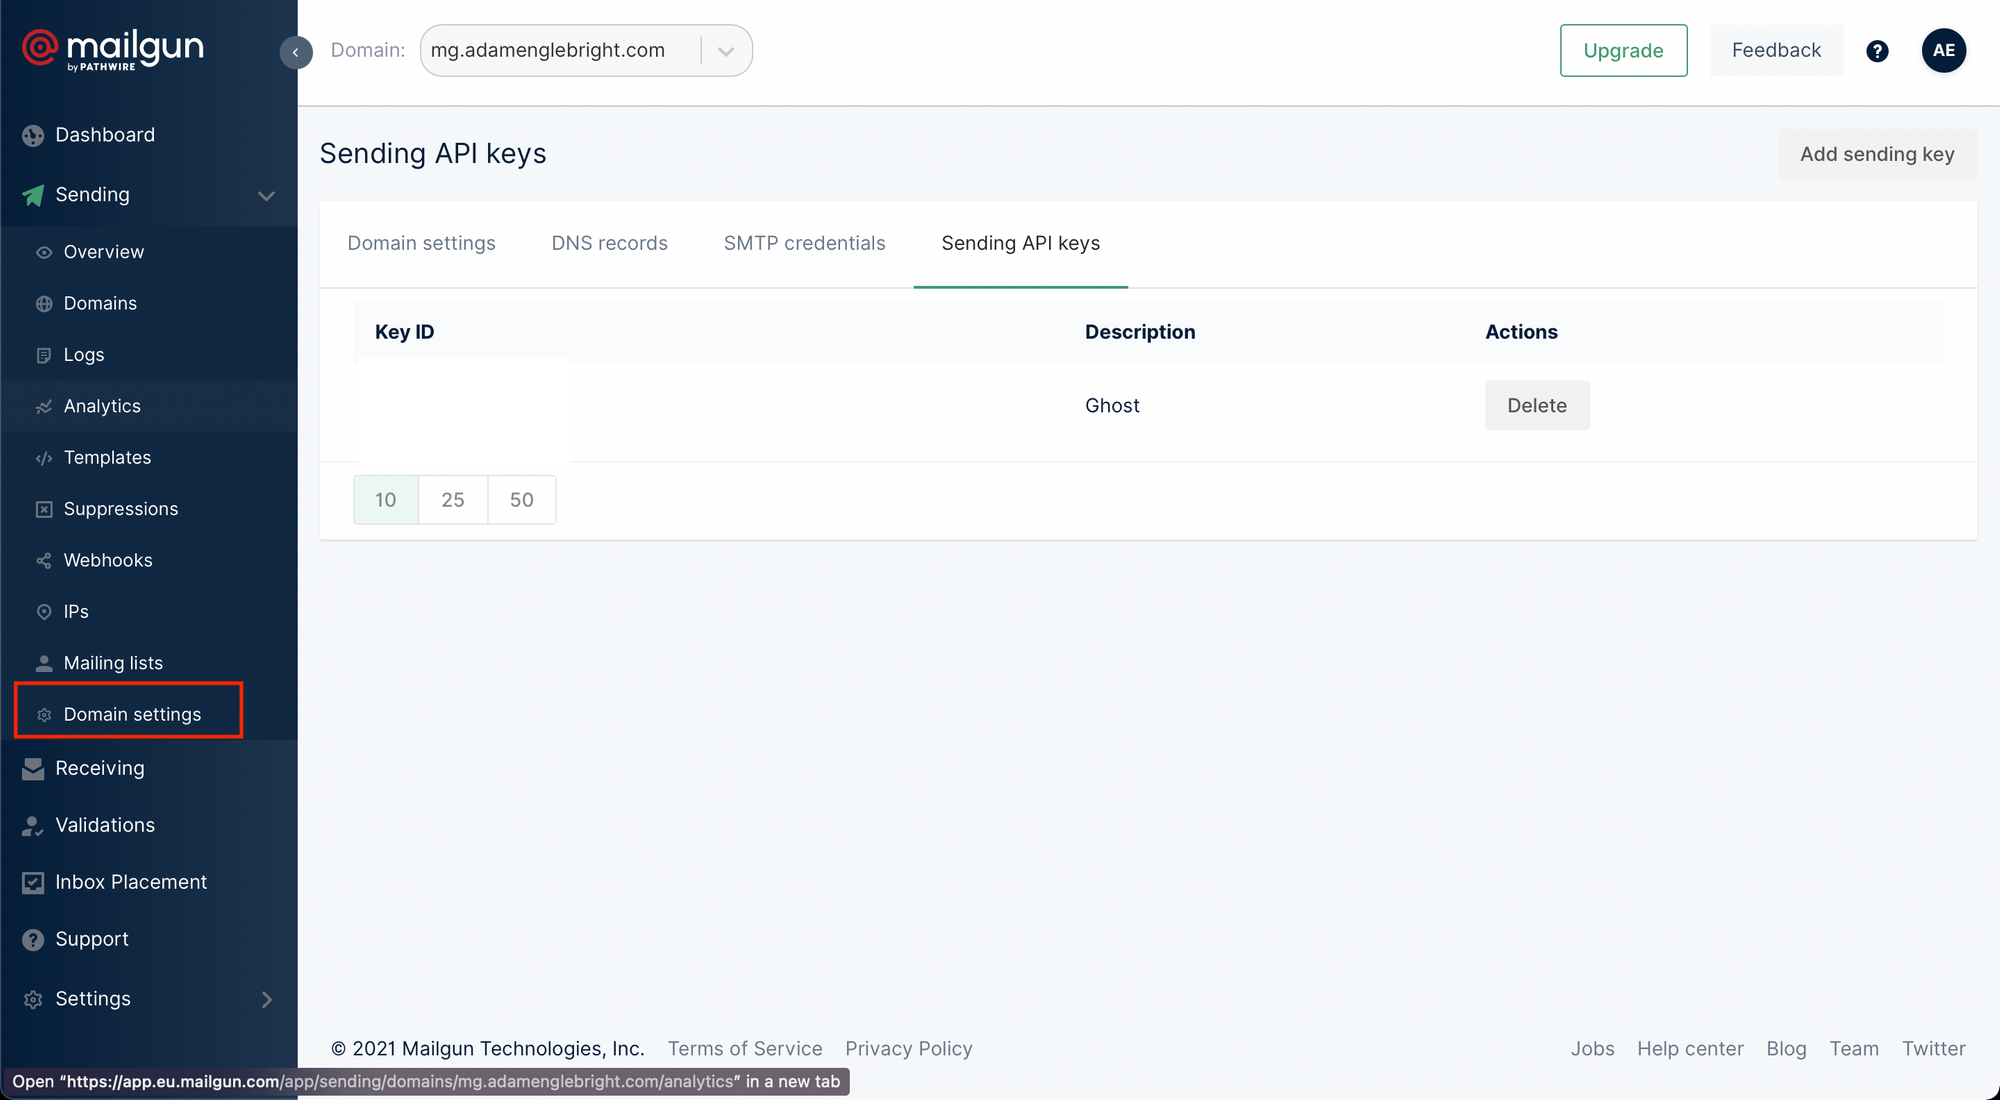
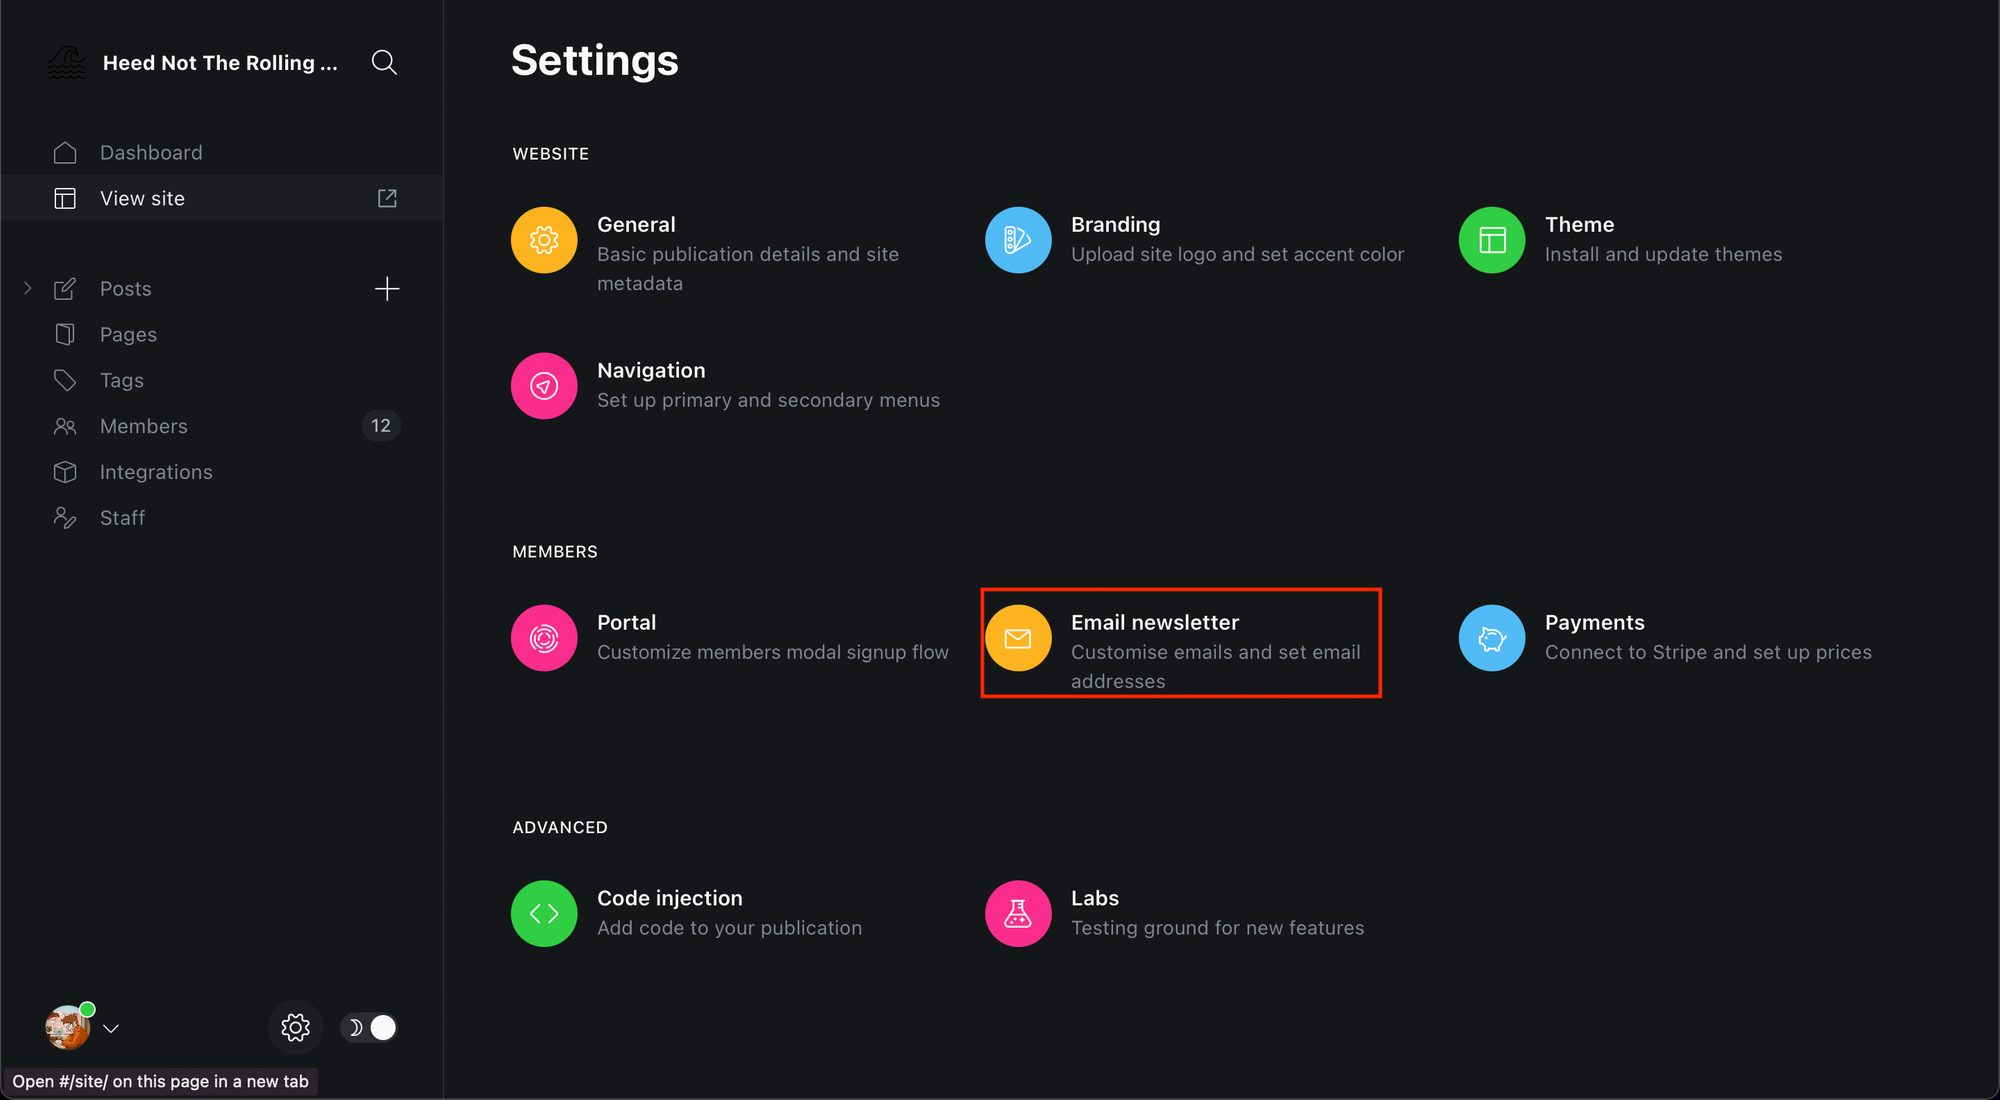
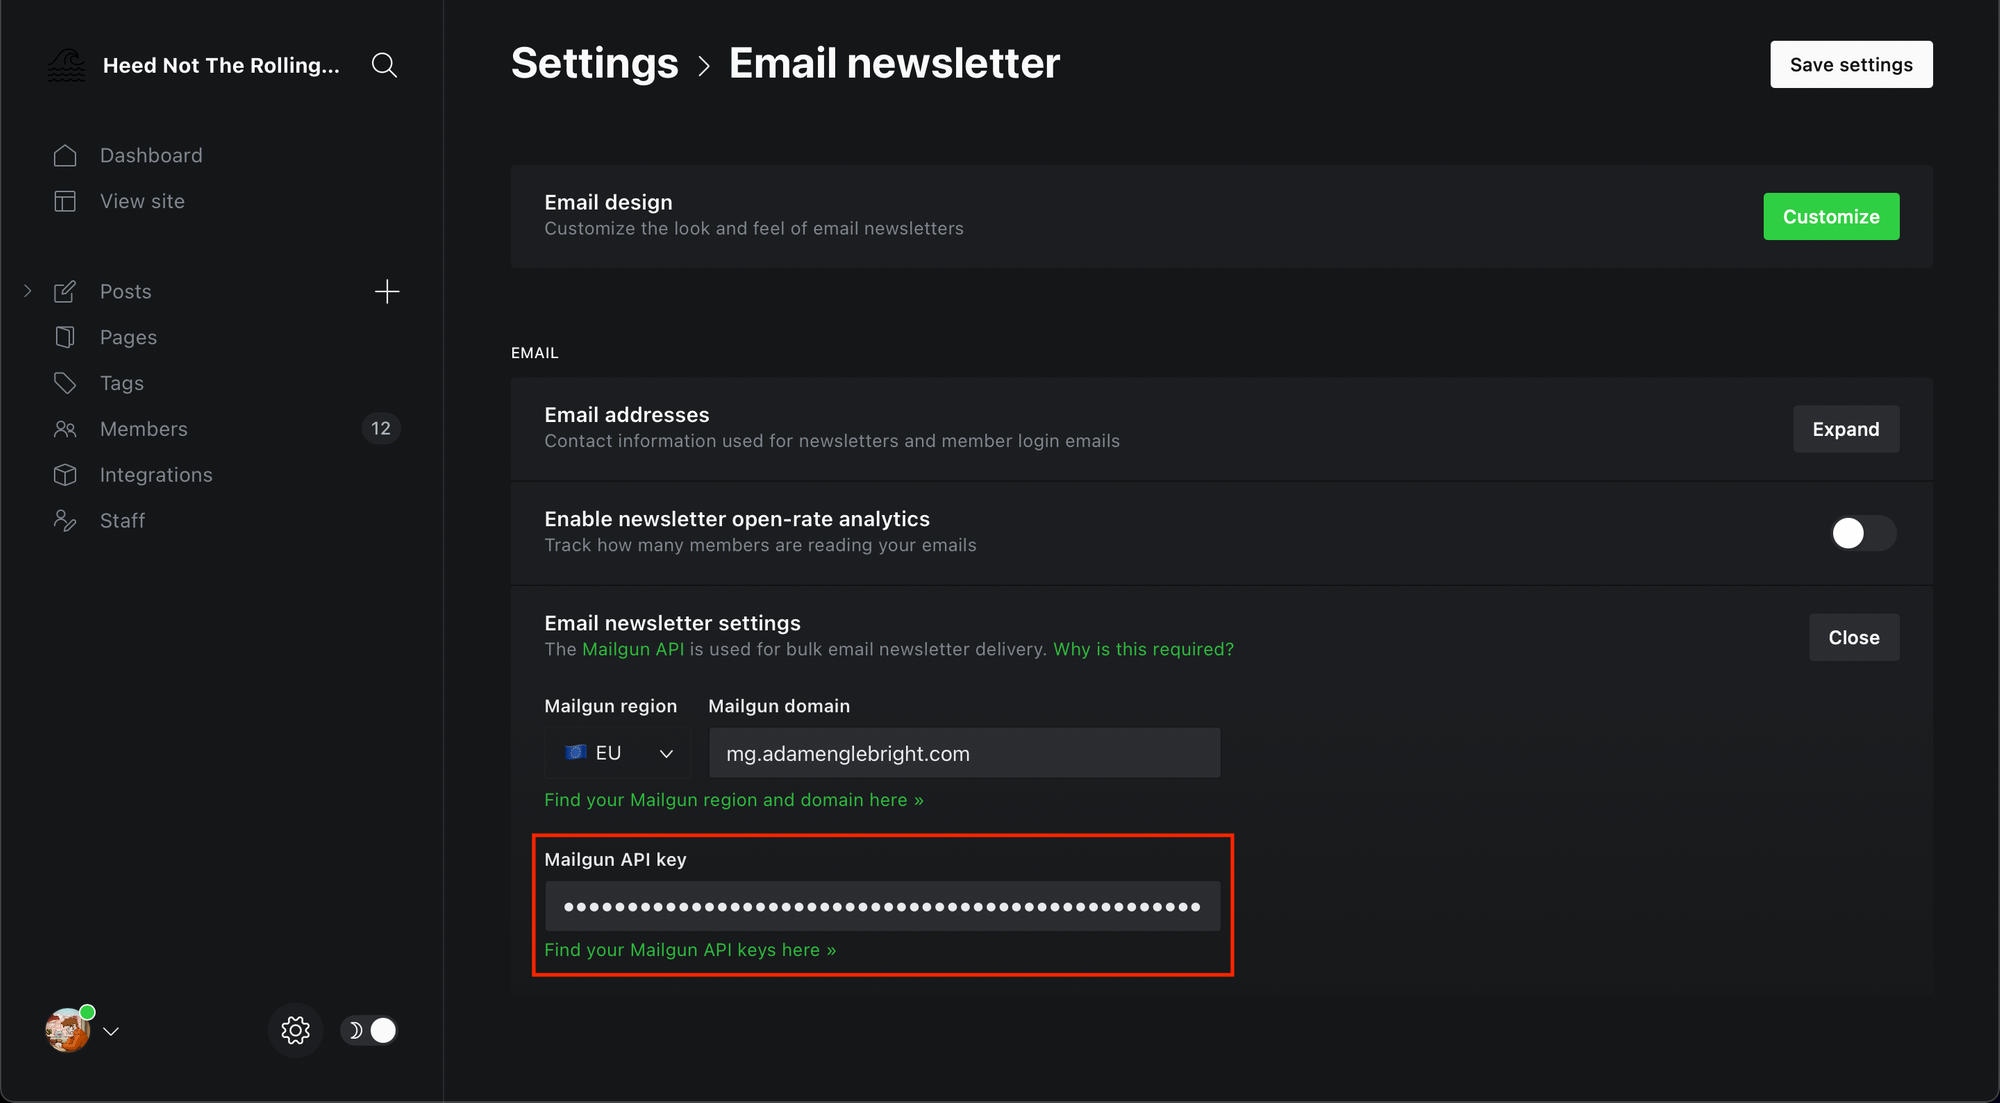
7. The API key deals with the bulk delivery, and you can add that in the Ghost interface, under Email newsletter:
8. The SMTP bit for transactional emails, though, is trickier: you've got to access the server and enter it into the configuration file manually. Why there isn't an option for this in the interface I'm not rightly sure, but there we go.
First you need to open Terminal and type
ssh [email protected]This will prompt you for your SSH passphrase, which you'll have noted down in phase 1 step 6! Once you're logged in, enter:
sudo -i -u ghost-mgrThis logs you in to the 'ghost-mgr' user that the Digital Ocean Ghost auto-config will have set up! Once you've done that, type:
cd ../..var/www/ghost
nano config.production.json
This will open up a file which contains a bunch of settings. You'll see a bit that says:
"mail":{
"transport": "Direct"
},
You'll want to replace that with
"mail": {
	"transport": "SMTP",
    	"options": {
        	"service": "Mailgun",
            "host": "smtp.eu.mailgun.org",
            "port": 465,
            "secureConnection": true,
            "auth": {
            	"user": "[email protected]",
                "pass": "yourpass"
       			}
        }
},
Once you've done that you'll want to 'write' it to the file (ctrl-o) and then exit the nano editor (ctrl-x). Then you'll want to restart Ghost:
ghost restartand hey presto, it should all work; your transactional emails should send as well as your bulk ones, and everyone should be happy. I'm certainly happy I've got to the end of this! Hopefully it's useful to you; if not it will hopefully be useful to me the next time I've got to do this and have forgotten :)